|
Interaction Client Web Edition Help |
|
|
Interaction Client Web Edition Help |
|
Requirements: You need an ACD Access License associated with the E-mail interaction type in order to work with email messages in Interaction Client. Also, in order to send an email interaction, you must be a member of a workgroup configured with an outbound email mailbox. You also need the View User Queues or Modify User Queues right to your own user queue. For more information about licensing and workgroup configuration, see your CIC administrator.
An outbound email interaction is an email message you send on behalf of a workgroup. It can be included in Customer Interaction Center reports and statistics. Additionally, as an interaction, it could be processed by any custom email handlers that are added to your Customer Interaction Center installation.
Important points to consider:
Sending an outbound email interaction is not the same as replying to an ACD-routed email message sent to a workgroup mailbox. You are initiating the interaction, not responding. For more information about responding to an ACD-routed email, see Reply to an E-mail Message.
A reply to an outbound email interaction is addressed to the appropriate workgroup mailbox and is routed as an ACD interaction. A reply would first appear in the appropriate workgroup queue and then be ACD-routed to My Interactions.
You can use an Interaction Client directory entry to address an email message, but send the message using your default email program. This is not an email interaction and is not counted in Interaction Center reports and statistics. For more information, see Send an E-mail Message.
To start an email interaction:
From the Interaction Client New menu, select Email Message.
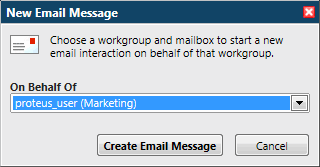
If you belong to more than one workgroup or a workgroup configured with one or more outbound mailboxes, select the appropriate workgroup and mailbox in the New Email Message dialog box. Click Create Email Message.
In the Email Window for Outgoing Messages, address the email message by doing one of the following.
Tip: Click Add Cc or Add Bcc to add carbon copy or blind carbon copy address text boxes to the email message.
In an address text box, type the addresses of the email message recipients, separating each address with a semi-colon (;).
In an address text box, type all of part of the recipient’s name. Click the "Search for" prompt. Select a name from the list of matching names.
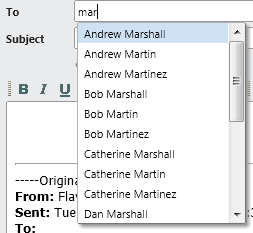
Note: This list contains matching email addresses that are configured on your Exchange server — typically, your company’s employee email addresses.
Optionally, type a message description in the Subject text box.
Note: Subject is limited to 1024 characters in Interaction Client. However, many email clients have much smaller limits so the recipient may see a truncated subject line.
Optionally, click the Attach a file link to locate and attach a file to this email message.
Note: Your system administrator configures the size limit for files you attach to an outgoing email message.
In the reply area, type your message.
Tip: Use Response Management to insert a stored response. For more information, see Use Response Management in an Email Message. You can also use any of the available tools to format your message. For a description of these tools, see Reply to an HTML Email Message.
Optionally, expand the Properties section and assign an Account code.
Tip: For more information, see Assign Codes to an Interaction.
Optionally, expand the Notes section and add notes or comments about this interaction.
Note: For more information, see Add Notes to an Interaction.
Optionally, do one of the following to save the email message without sending it:
Click Save to save this email message as a connected interaction.
Close the email window to save this email message as a held interaction.
Result: The email message is not sent. You can pick up this interaction later, make any necessary changes or additions and then send it.
To send this email message, click Send.
If necessary, close the Email window for this interaction.
Note: You can set your Email Configuration to perform this action automatically.
Related Topics