|
Interaction Client Web Edition Help |
|
|
Interaction Client Web Edition Help |
|
Using the Callback feature, visitors to your company’s website can leave a request for an agent to call them back. A visitor starts the Callback process by clicking the appropriate button on a webpage and completing information in a Callback dialog box. Customer Interaction Center routes the request as a callback interaction and it appears in the appropriate queue.
Note: In addition to calling the visitor back, you can assign an account code and a wrap-up code per call. You can also add notes related to the callback.
A callback request and the call made in response to a callback request are identified by their icons.

When you pick up a callback request interaction, its state changes to ACD Assigned: (Agent name), and other agents are not able to respond to this request. However, if the callback request is transferred to you, or if you pick it up even though you are a not a member of the workgroup to which it was routed, its state changes to Connected.
When you make a call in response to a callback request, the new call is associated with the Callback request as a child item. It is indented under the original callback request.
The Callback window appears when you pick up a callback request.
Tip: If you prefer not to see the sidebar view, click the splitter bar to collapse that portion of the Callback window.
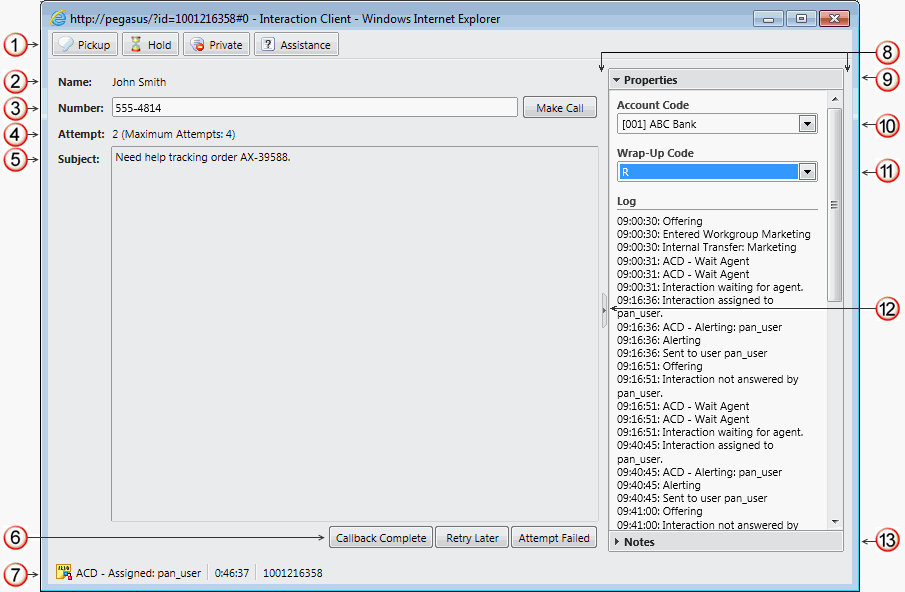
1 |
The toolbar contains buttons for most of the functions for managing a callback request. |
|
2 |
The name of the person who requested that someone call them back. |
|
3 |
The telephone number supplied by the person who requested the callback. Clicking the Make Call button dials the telephone number. |
|
4 |
If your CIC administrator enables the Retry later feature, this displays the number of calls attempted in response to the callback request and the maximum number of attempts allowed. |
|
5 |
This area displays the reason the callback was requested. This information is usually required as a part of the process for requesting a callback. |
|
6 |
After you make the requested call, use these buttons to indicate whether you reached the requester or not. For more information, see Respond to a Callback Request. Callback Complete Click this button to indicate you reached the requester and completed the callback interaction. Retry Later The Retry Later button appears only if your CIC administrator has enabled this feature. Click this button to remove the callback request from your queue and place it back on the workgroup queue in a "Snoozed" state. After an interval configured by your CIC administrator, the callback request is routed back to your queue. The CIC administrator also configures the maximum number of times you can put a callback request into a "Snoozed" state. Attempt Failed Click this button to indicate that you cannot complete the callback request. It could be that the phone number is incorrect or that no one answered after the last allowed attempt. Tip: If your CIC system is appropriately configured, you may be able to select a wrap-up code that explains the reason for this failure. |
|
7 |
The Status bar displays the ID number, duration and state of the interaction. For more information, see Queue Contents. |
|
8 |
The appearance of the sidebar area can vary based on your user rights. It contains controls and information that are related to the callback request. |
|
9 |
Click the Properties section control to display the Account Code, Wrap-Up Code and Log sections |
|
10 |
Some companies categorize interactions by customer. If you have the appropriate rights, you can assign an Account code to the callback interaction. For more information, see Understanding Account Codes and Assign Codes to an Interaction. |
|
11 |
If you are a member of a workgroup for which Wrap-up codes are configured, you can use this drop-down list to assign a wrap-up code to the callback interaction. For more information, see Understanding Wrap-Up Codes and Assign Codes to an Interaction. |
|
12 |
If you prefer not to see the sidebar area, click the splitter to hide that part of the Chat window. Click the splitter again to restore the sidebar area. |
|
13 |
Use the Notes section to add notes or comments about the ongoing chat. Other chat participants do not see these comments. For more information, see Add Notes to an Interaction. To add a note about the callback, type in the text box and click Add Note. For more information, see Add Notes to an Interaction. Note: These notes are visible to other Interaction Client users who are "Listening to" (monitoring) this chat. For more information, see Monitor a Chat. After the callback request is disconnected, these notes can be available in the Notes section of the Related Items view if the callback requester is identified and the Customer Interaction Center system collects this information. For more information, see your CIC administrator. |
Related Topics