|
Interaction Client Web Edition Help |
Requirements: If you do not have the View Account Codes Access Control right, Account Code fields do not appear. You also need the Account Code Verification Security right to assign an Account Code to an interaction. The Use advanced dialing option client configuration option must be enabled in order for you to see the Advanced Dialing Options dialog box
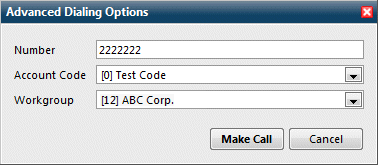
If your company uses account codes or tracks calls by workgroup, then you can be prompted to assign an account code or ACD workgroup every time you make a call. Your system must be appropriately configured in order for you to be prompted. For more information, see Advanced Dialing Options.
To assign an account code or a workgroup to an outgoing interaction:
Do one of the following:
Enter a telephone number in the Number field.

Note: For more information about entering letters, parentheses or other special characters, see Entering Telephone Numbers.
Click the down arrow to the right of the Number field and select one of your recently dialed numbers from the drop-down list.
Click the Make Call button or press Enter.
Result: The Advanced Dialing Options dialog box appears.

Click the arrows at the end of the Account Code or Workgroup Code drop-down lists and select the codes you want to assign to this interaction and click OK.
Result: The call is started.
Note: If your CIC administrator has configured and enabled account codes, an account code is required. A workgroup code signifies that the call was made on behalf of a workgroup. You can select <None> for calls not made for a workgroup.
Tip: For more information, see Advanced Dialing Options.
You can use the Properties window to set an account code for any incoming or outgoing interaction. A workgroup code can only be assigned when you start the interaction, not after it has started.
To assign an account code to an outgoing interaction using the Interaction Properties dialog box:
During an outgoing interaction, right-click the interaction and choose Properties from the menu that appears.
Result: The Interaction Properties dialog box appears.
In the Interaction Properties dialog box, click the arrow at the end of the Account Code field and select the account code you want to assign to this interaction.
Optionally, if your CIC administrator configured wrap-up codes, you can assign a Wrap-up Code in a similar fashion.
Click the Close button in the upper right corner of the Interaction Properties dialog box.
Result: The account code you assigned to the interaction appears in the Account Code column of your queue.
Related Topics